Build Your Own Computer Cluster Using Raspperi Pi
Have a computer cluster around your hands is a good thing if you want to hacking something fun. You can experiment your new ideas, do some distribute computing experiment, learning how to do network configuration. The most important, you have the control feeling from the peace of mind. Yes! All that is the goal of a hacking soul. In this article, we will build a Raspberry-Pi cluster, let’s go!
1. Hadware prepare
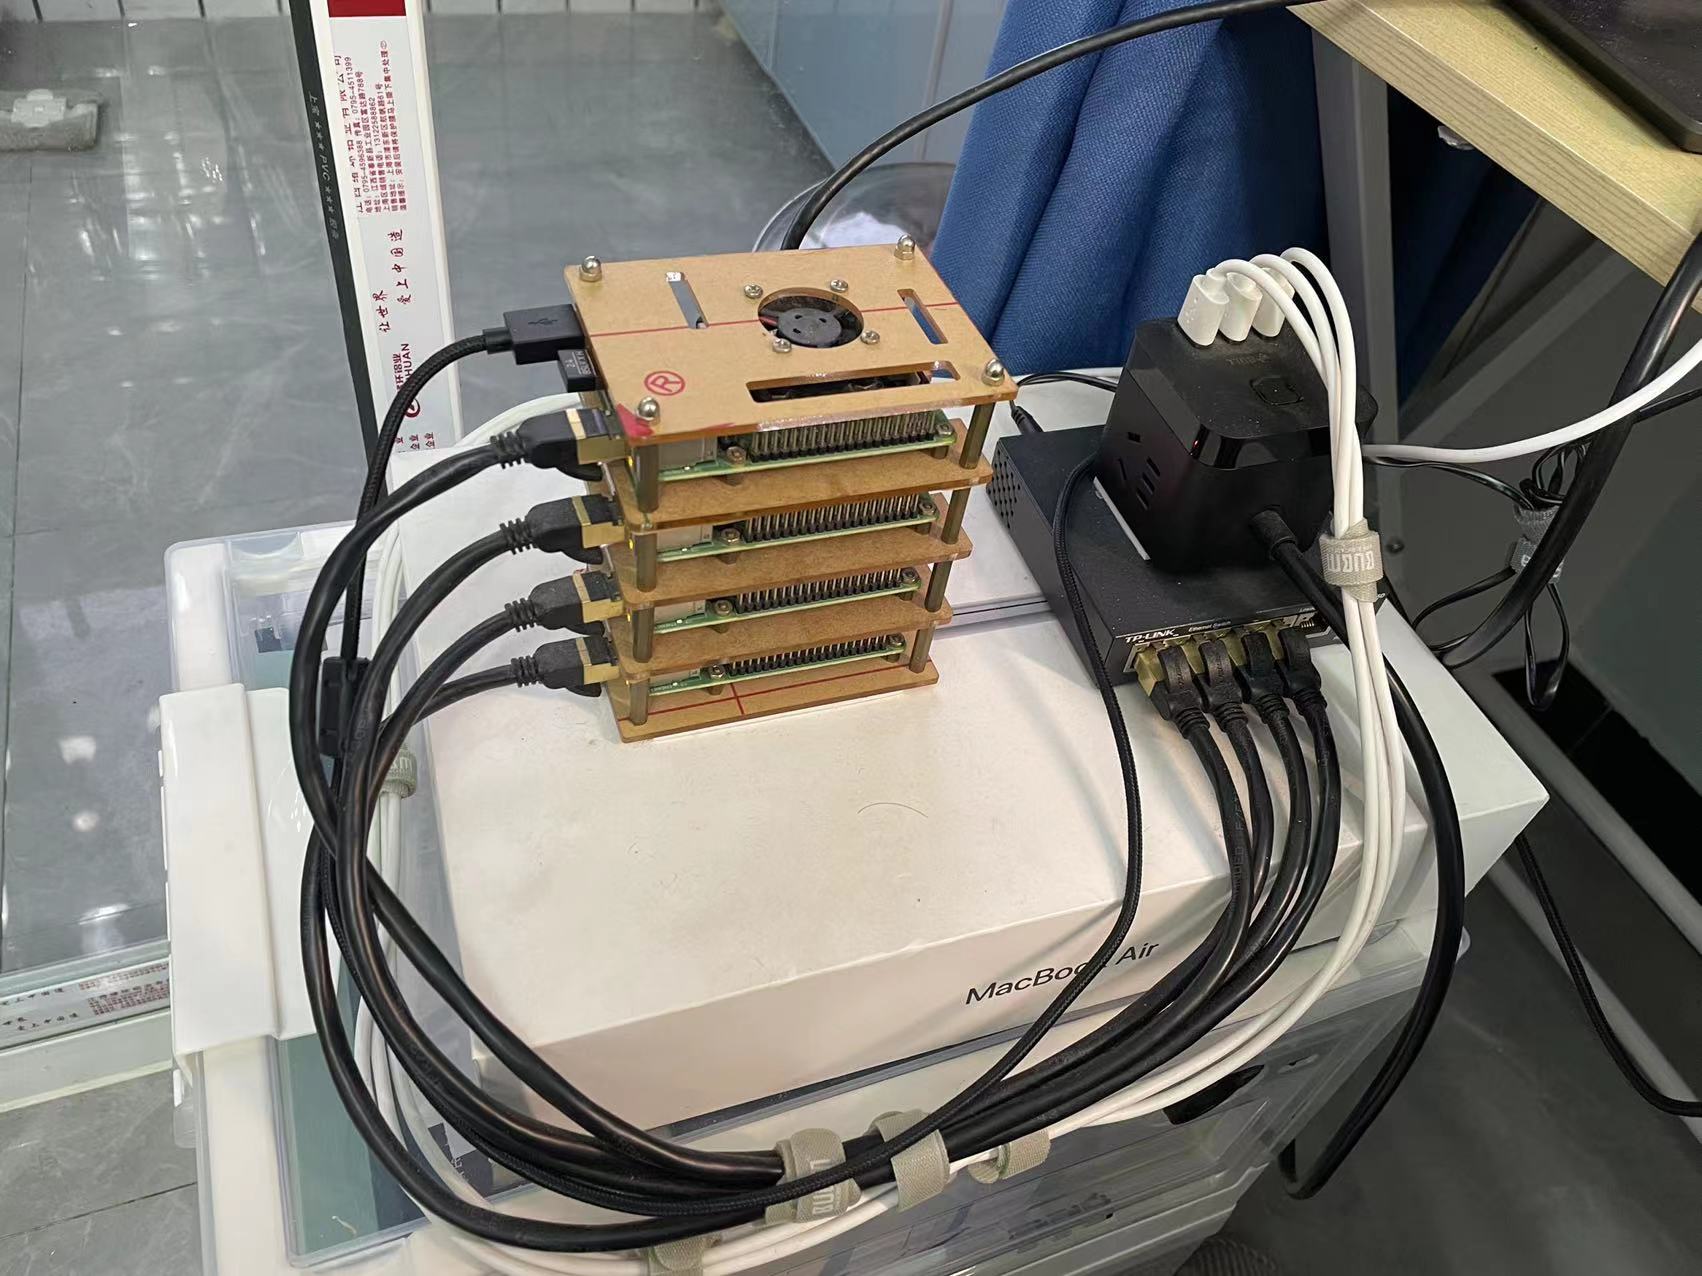
- Four Raspberry-Pi 4B(4GB) – $120 * 4
- Four SDHC card(32GB) – $5 * 4
- Four 12-inch Cat.6 Ethenet cables – $1 * 4
- Four 12-inch USB A-Micro USB cables – $1 * 4
- One 5-port 10/100 Fast Ethenet switch(with charger) – $12
- One 5-port USB charger
- One Raspberry-Pi stackble case capable of holding 4 Pis – $10
Use your toolset, construct out the bare-metal Raspberry-Pi cluster. The following is
my cluster:
2. Sofeware prepare
Use a laptop to burn Raspberry Pi OS(https://www.raspberrypi.com/software) into the 4 SDHC card, then plug the sd cards into the 4 Raspberry-Pi. You can find many tutorial on the internet. I just pass it over now!
3. Config master node into a DHCP server
Each node(a Raspberry-Pi card) should have its own ip in the cluster, so we will config the master node as the dhcp server.
3.1 Set master node network interface
Edit /etc/network/interfaces.d/eth0 on master node, if not have this file, create a new file(use sudo):
# the internal (wired) network interface
allow-hotplug eth0
iface eth0 inet static
  address 10.0.0.1
  network 10.0.0.0
  netmask 255.255.255.0
  broadcast 10.0.0.255
  gateway 10.0.0.1
This is the ethrenet interface config. Net we config wireless interface. Edit /etc/network/interfaces.d/wlan0, if not have this file, create a new file(use sudo):
# the external (wifi) interface
allow-hotplug wlan0
iface wlan0 inet static
  address 192.168.0.113
  network 192.168.0.0
  netmask 255.255.255.0
  broadcast 192.168.0.255
  gateway 192.168.0.1
  wpa-ssid "Name"
  wpa-psk "Password"
Name is user name of your wireless network, Password is your password. After all this editing, you can run
sudo reboot
to reboot the mechine, then master node will have the static ip 10.0.0.1.
3.2 DHCP server install
Run the following command:
sudo apt-get install isc-dhcp-server
After dhcp-server installed, you need do some config, fist edit /etc/dhcp/dhcpd.conf:
option domain-name "cluster.home";
option domain-name-servers 180.76.76.76;

subnet 10.0.0.0 netmask 255.255.255.0 {
    range 10.0.0.1 10.0.0.10;
    option subnet-mask 255.255.255.0;
    option broadcast-address 10.0.0.255;
    option routers 10.0.0.1;
    group {
      host node-1 { hardware ethernet dc:a6:32:b0:94:d3; fixed-address 10.0.0.1; }
      host node-2 { hardware ethernet dc:a6:32:90:31:cc; fixed-address 10.0.0.2; }
      host node-3 { hardware ethernet dc:a6:32:90:31:93; fixed-address 10.0.0.3; }
      host node-4 { hardware ethernet dc:a6:32:90:30:8b; fixed-address 10.0.0.4; }
    }
}

default-lease-time 600;
max-lease-time 7200;
authoritative;
- This dhcp will allocate specific ip to specific mechine according to their MAC address;
- 10.0.0.1 – 10.0.0.10 is the addresses pool.
Then, edit /etc/default/isc-dhcp-server:
INTERFACESv4="eth0"
Finally, restart isc-dhcp-server:
sudo systemctl restart isc-dhcp-server
Plug the remain 3 Raspberry-Pi card to the Ethenet switch, they will get their specific ip.
4. NAT and iptables setting
The final step is setting network address translation(NAT) so that the worker nodes can reach the public internet.
4.1 Enable ip forwarding
Edit /etc/sysctl.conf:
net.ipv4.ip_forward=1
4.2 Reset iptables:
Execute the following script(make sure iptables is installed):
#!/bin/sh
 IPTABLES="$(which iptables)"
# RESET DEFAULT POLICIES
 $IPTABLES -P INPUT ACCEPT
 $IPTABLES -P FORWARD ACCEPT
 $IPTABLES -P OUTPUT ACCEPT
 $IPTABLES -t nat -P PREROUTING ACCEPT
 $IPTABLES -t nat -P POSTROUTING ACCEPT
 $IPTABLES -t nat -P OUTPUT ACCEPT
 $IPTABLES -t mangle -P PREROUTING ACCEPT
 $IPTABLES -t mangle -P OUTPUT ACCEPT
# FLUSH ALL RULES, ERASE NON-DEFAULT CHAINS
 $IPTABLES -F
 $IPTABLES -X
 $IPTABLES -t nat -F
 $IPTABLES -t nat -X
 $IPTABLES -t mangle -F
 $IPTABLES -t mangle -X
Then all iptables rules is cleared.
4.3 Apply new iptables rules:
#!/bin/sh
IPT="$(which iptables)"
LOCAL_IFACE=eth0
INET_IFACE=wlan0
INET_ADDRESS=192.168.0.113

# Flush the tables
$IPT -F INPUT
$IPT -F OUTPUT
$IPT -F FORWARD

$IPT -t nat -P PREROUTING ACCEPT
$IPT -t nat -P POSTROUTING ACCEPT
$IPT -t nat -P OUTPUT ACCEPT

# Allow forwarding packets:
$IPT -A FORWARD -p ALL -i $LOCAL_IFACE -j ACCEPT
$IPT -A FORWARD -i $INET_IFACE -m state --state ESTABLISHED,RELATED -j ACCEPT

# Packet masquerading
$IPT -t nat -A POSTROUTING -o $INET_IFACE -j SNAT --to-source $INET_ADDRESS
After excute the previous script, check your iptables rule:
sudo iptables -L
The result:
Chain INPUT (policy ACCEPT)
target     prot opt source               destination

Chain FORWARD (policy ACCEPT)
target     prot opt source               destination
ACCEPT     all  --  anywhere             anywhere             state RELATED,ESTABLISHED
ACCEPT     all  --  anywhere             anywhere

Chain OUTPUT (policy ACCEPT)
target     prot opt source               destination
4.4 Save new iptables rules
sudo iptables-save > dump.txt
sudo mv dump.txt /etc/network/iptables
edit /etc/network/iptables:
pre-up iptables-restore < /etc/network/iptables
Now, each time when master node start, it will use iptable rules in /etc/network/iptables:
# Generated by iptables-save v1.8.7 on Sun Jan 16 21:40:17 2022
*mangle
:PREROUTING ACCEPT [303:279052]
:INPUT ACCEPT [0:0]
:FORWARD ACCEPT [0:0]
:OUTPUT ACCEPT [25:4501]
:POSTROUTING ACCEPT [0:0]
COMMIT
# Completed on Sun Jan 16 21:40:17 2022
# Generated by iptables-save v1.8.7 on Sun Jan 16 21:40:17 2022
*filter
:INPUT ACCEPT [303:279052]
:FORWARD ACCEPT [0:0]
:OUTPUT ACCEPT [25:4501]
-A FORWARD -i eth0 -j ACCEPT
-A FORWARD -i wlan0 -m state --state RELATED,ESTABLISHED -j ACCEPT
COMMIT
# Completed on Sun Jan 16 21:40:17 2022
# Generated by iptables-save v1.8.7 on Sun Jan 16 21:40:17 2022
*nat
:PREROUTING ACCEPT [7:3845]
:INPUT ACCEPT [124:29866]
:OUTPUT ACCEPT [0:0]
:POSTROUTING ACCEPT [0:0]
-A POSTROUTING -o wlan0 -j SNAT --to-source 192.168.0.113
COMMIT
# Completed on Sun Jan 16 21:40:17 2022
5. A big trouble shooting
A big problem confuse me about 3 weeks. when all the previous steps finished! The linux kernel maintains a routing table that helps it to know where to send packages with different address. The contents can be seen with the command route:
Kernel IP routing table
Destination     Gateway         Genmask         Flags Metric Ref    Use Iface
default         192.168.0.1     0.0.0.0         UG    303    0        0 wlan0
10.0.0.0        0.0.0.0         255.255.255.0   U     0      0        0 eth0
link-local      0.0.0.0         255.255.0.0     U     202    0        0 eth0
192.168.0.0     0.0.0.0         255.255.255.0   U     303    0        0 wlan0
to make sure wlan0 as the default network interface, add this script to /etc/init.d:
#! /bin/sh

### BEGIN INIT INFO
# Provides:		default routes for wlan0
# Required-Start:	$syslog $network
# Required-Stop:	$syslog
# Default-Start:	2 3 4 5
# Default-Stop:		0 1 6
# Short-Description:	remove default route 10.0.0.1
### END INIT INFO

sudo route del default gw 10.0.0.1 eth0
we name this script as setuproutings, then
sudo chmod +x /etc/init.d/setuproutings
sudo systemctl enable setuproutings
sudo systemctl start setuproutings
6. Epilogue:
Build a cluster from bare mental is a great challeage, but it is a great fun when you finish it! Good Luck!